# BitLocker 密钥管理说明
当 Windows 客户端开启了 BitLocker 功能,并且安装 EPM Agent 的端点安全组件, EPM 便能从客户端上搜集 BitLocker 恢复密钥,帮助客户更好地管理 BitLocker 密钥,当用户忘记 BitLocker 密码时,管理员可以从 EPM 查询该设备相关的恢复密钥,帮忙解密设备恢复数据
EPM 默认有两种查看密钥的方式
- 从设备视图查看
在设备视图中选中对应的设备,右键菜单选择 Security and Patch > Recover keys > BitLocker
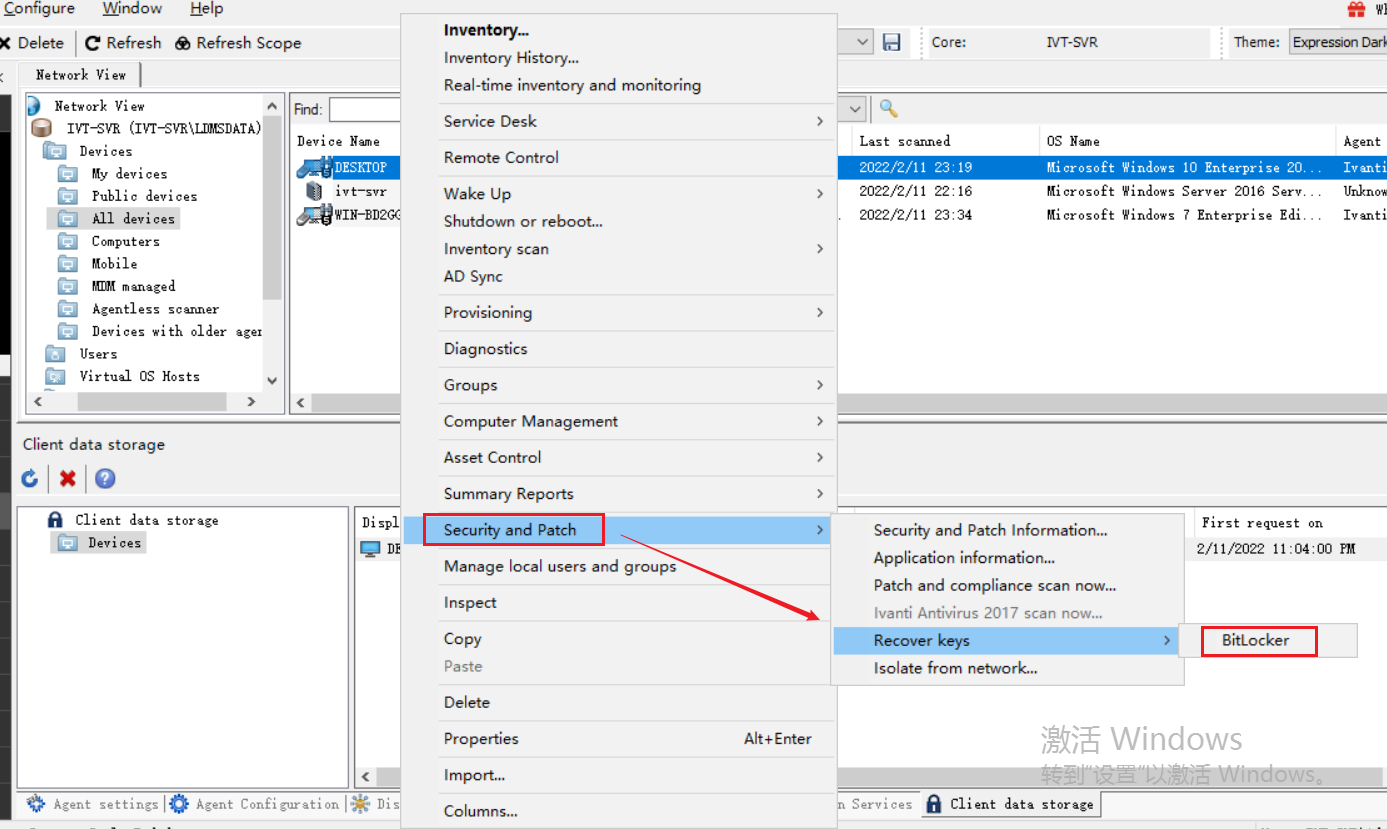
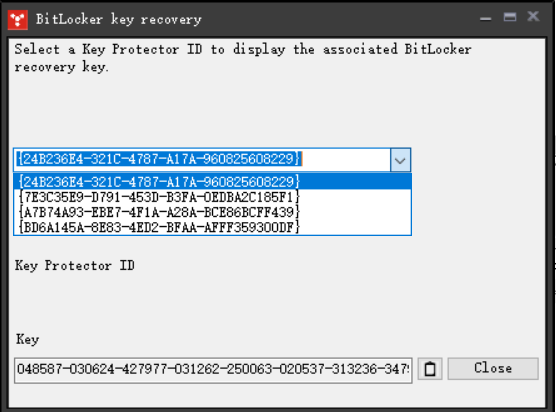
在 BitLocker 窗口选择对应的驱动器 ID,下面的 Key 便是恢复密钥
- 从客户端数据存储查看
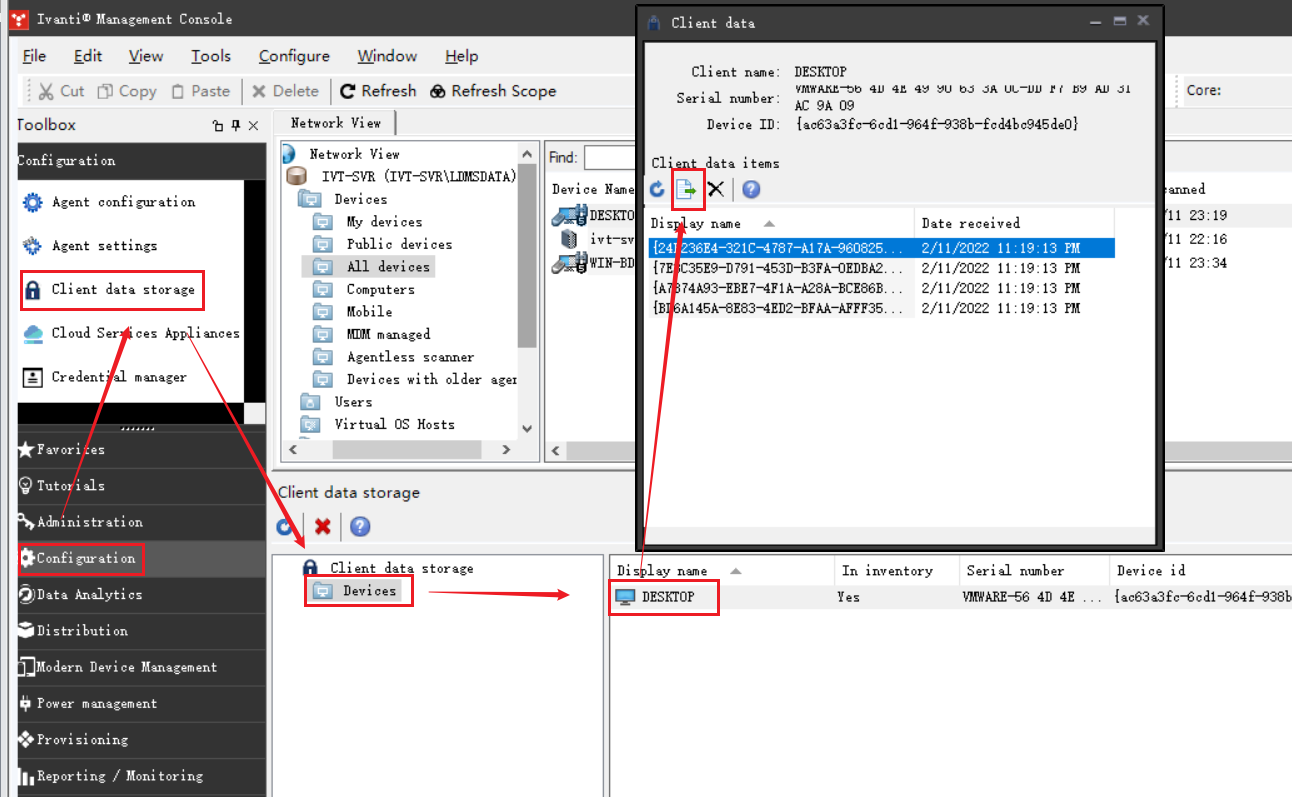
在工具箱导航中依次点击 Configuration > Client data storage > Devices , 这里显示所有已搜集到 BitLocker 密钥的设备,选择对应的设备,将密钥导出即可查看
老实说,这两种查看方法其实都不太方便,例如当用户想通过搜索对应的 Key Protector ID 直接查看对应的恢复密钥,这两种方法就没办法实现
如果想实现通过搜索找出,那么就需要客户清单数据里能够搜集到 BitLocker 密钥信息,但是 EPM 清单数据搜集的信息并不包含 BitLocker 恢复密钥
于是我就在 ivanti 论坛搜索有没有相关的案例,很幸运找到一篇相关的文档,文档中详细的讲述了如果利用 PowerShell 脚本将 BitLocker 恢复密钥写入到注册表中,然后通过 EPM 的自定义搜集功能,将客户端的注册表信息搜集到清单系统
# 脚本实现
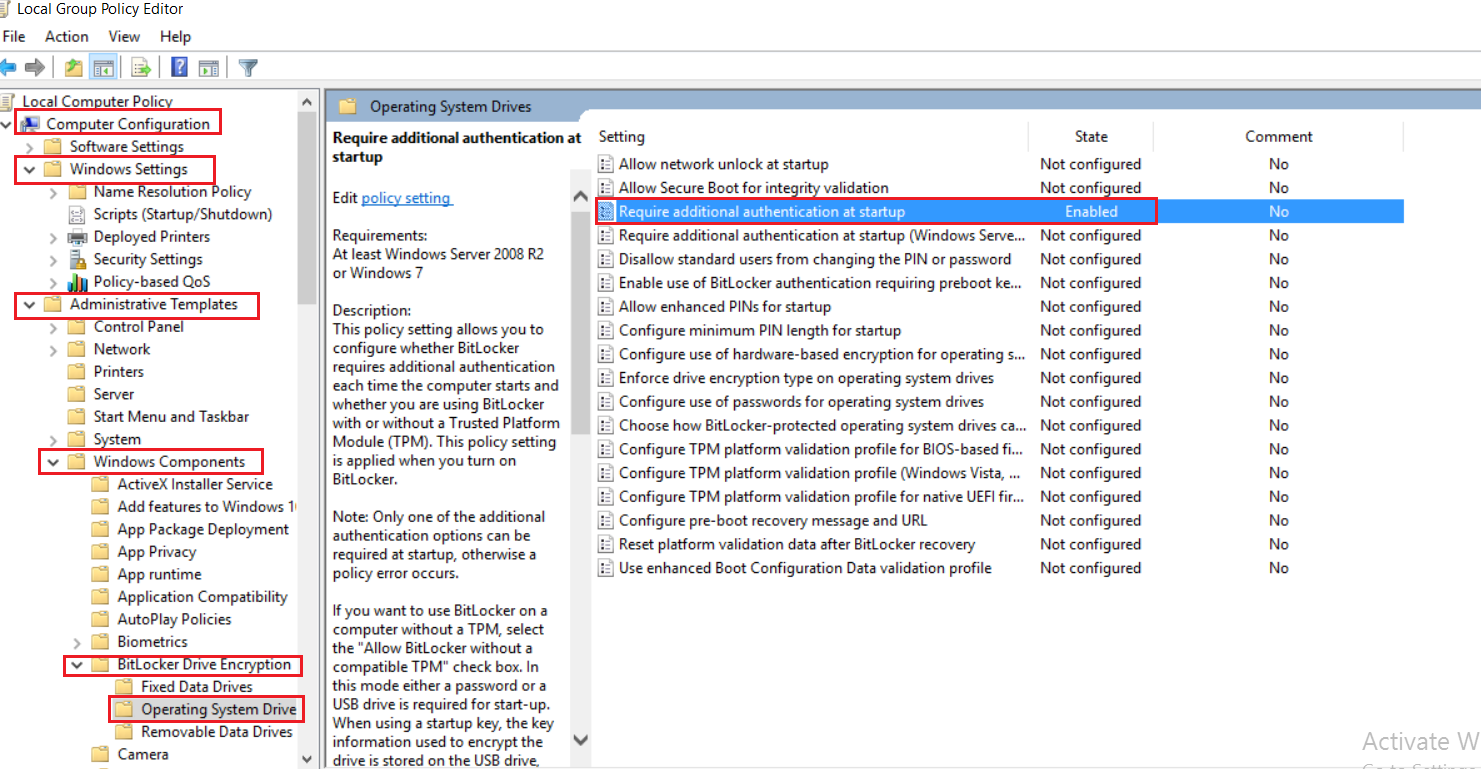
脚本这边我根据文档提供的脚本进行了一点点修改,另外自己写了个自动启用 BitLocker 的脚本,开启 BitLocker 前需要在本地组策略开启身份认证策略
将下面的命令复制到文本,保存为 ps1 脚本文件
Enable BitLocker
#Get the drive letter | |
$DiskList = Get-Volume | where { ($_.DriveType -like 'Fixed') -and ($_.FileSystemLabel -notlike 'System Reserved')} | select -expand DriveLetter | |
#Check if Bitlocker is enabled | |
$Check = Get-Command 'manage-bde' -errorAction SilentlyContinue | |
#Set the BitLocker Password | |
# $SecureString = ConvertTo-SecureString "password" -AsPlainText -Force | |
$SecureString = Read-Host "Please enter your BitLocker password: " -AsSecureString | |
#Enable BitLocker | |
Foreach($disk in $DiskList) | |
{ | |
if ($disk -ne "C"){ | |
Enable-BitLocker -MountPoint $disk':' -EncryptionMethod Aes256 -UsedSpaceOnly -password $SecureString -PasswordProtector | |
Start-Sleep -Seconds 3 | |
Enable-BitLocker -MountPoint $disk':' -EncryptionMethod Aes256 -UsedSpaceOnly -RecoveryPasswordProtector | |
} | |
} | |
Enable-BitLocker -MountPoint C: -EncryptionMethod Aes256 -UsedSpaceOnly -password $SecureString -PasswordProtector | |
Start-Sleep -Seconds 3 | |
Enable-BitLocker -MountPoint C: -EncryptionMethod Aes256 -UsedSpaceOnly -RecoveryPasswordProtector | |
#Reboot Computer | |
#Start-Sleep -Seconds 5; Restart-Computer -Force |
以管理员权限运行 powershell ,然后执行对应的脚本,设置 BitLocker 密码,按回车开始启用 BitLocker 加密分区
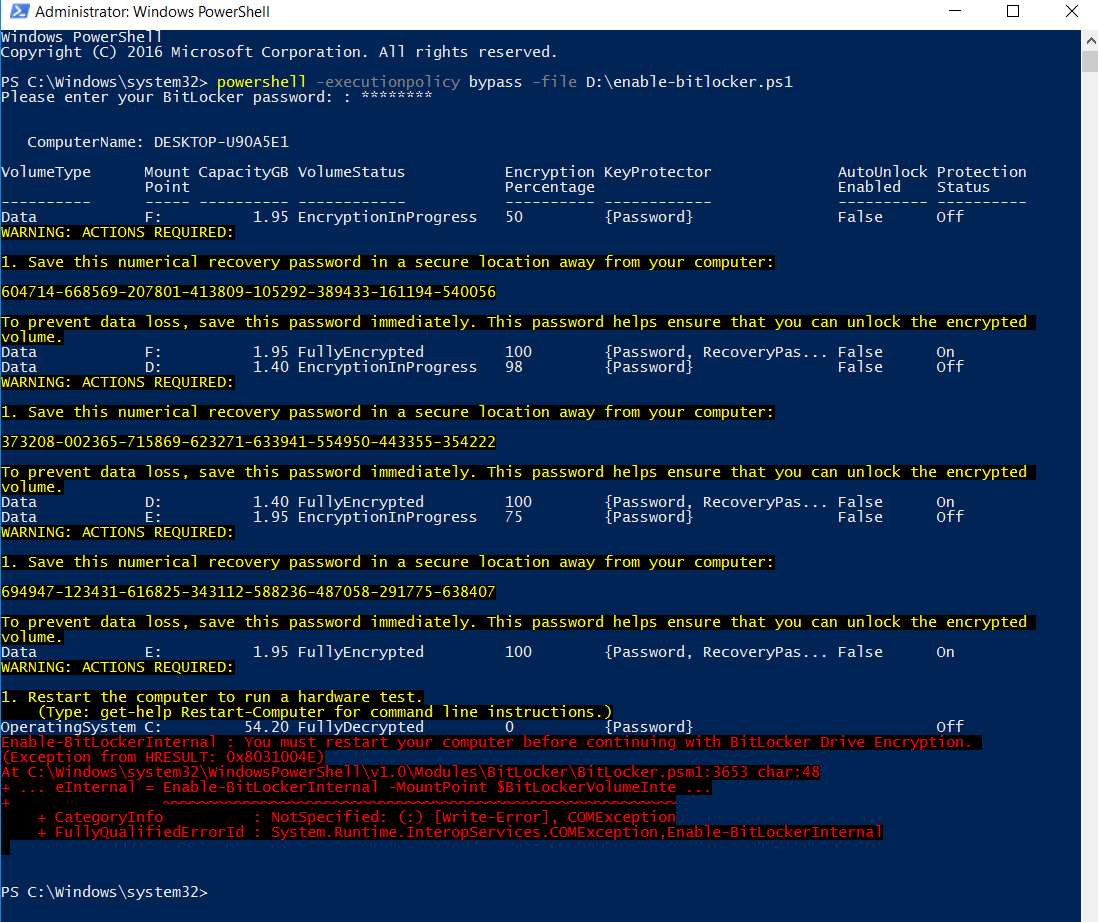
红字报错信息提示需要重启计算机,开启 BitLocker 后必须重启计算机才生效,这里就直接重启了
重启后执行另一个脚本实现自动解锁磁盘分区,并将加密的驱动盘和密钥信息写入到注册表
Local User
#Create registry key to store the Bitlocker information | |
New-Item -Path "HKLM:\SYSTEM" -Name "BLStatus" -ErrorAction Continue | |
#Get the drive letter | |
$DiskList = Get-Volume | where { ($_.DriveType -like 'Fixed') -and ($_.FileSystemLabel -notlike 'System Reserved')} | select -expand DriveLetter | |
#Check if Bitlocker is enabled | |
$Check = Get-Command 'manage-bde' -errorAction SilentlyContinue | |
if ($Check -eq $null){ | |
$hostname = hostname | |
[pscustomobject]@{ | |
Hostname=$hostname | |
DiskList= [string]$DiskList | |
EncryptionStatus="No BitLocker installed" | |
RecoveryKey="" | |
BackupStatus="N/A" | |
Date=date | |
} | Write-Host | |
break | |
} | |
#Enter the BitLocker Password | |
#$SecureString = ConvertTo-SecureString "password" -AsPlainText -Force | |
$SecureString = Read-Host "Please enter your BitLocker password: " -AsSecureString | |
#Save Recovery Keys in registry and force Sync with AD | |
[int]$c = 1; | |
Foreach($disk in $DiskList) | |
{ | |
# unlock and autounlock disk | |
if ($disk -ne "C") | |
{ | |
Unlock-BitLocker -MountPoint $disk':' -Password $SecureString | |
Start-Sleep -Seconds 3 | |
Enable-BitLockerAutoUnlock -MountPoint $disk':' | |
} | |
$ID = & 'manage-bde' '-protectors' '-get' $disk':' '-type' 'RecoveryPassword' | |
[int]$i = 0; | |
foreach($s in $ID){ | |
$i+=1; | |
if ($s.Contains("{")){ | |
$start = $s.IndexOf("{") | |
$end = $s.IndexOf("}") | |
$Key = $s.Substring($start,$end-$start+1) | |
$Password = $ID[$i+1].Trim() | |
New-ItemProperty -Path "HKLM:\SYSTEM\BLStatus" -Name RecoveryKeyID$c -PropertyType String -Value $disk": "$Key -Force | |
New-ItemProperty -Path "HKLM:\SYSTEM\BLStatus" -Name RecoveryKey$c -PropertyType String -Value $disk": "$Password -Force | |
[int]$c = $c + 1; | |
# Backup Recovery Keys and return status in sdclient log | |
$Backup = & 'manage-bde' '-protectors' '-adbackup' $disk':' '-ID' $Key | |
foreach($s in $Backup){ | |
if ($s.Contains("success")){ | |
$Backup = "Successfull" | |
break | |
} | |
else{$Backup = "Failed"} | |
} | |
$hostname = hostname | |
[pscustomobject]@{ | |
Hostname=$hostname | |
DiskList=$disk | |
EncryptionStatus=$Status | |
RecoveryKey=$Password | |
BackupStatus=$Backup | |
Date=date | |
} | Write-Host | |
} | |
} | |
$date = date | |
} |
执行后打开注册表确认 BitLocker 秘钥信息是否已写入
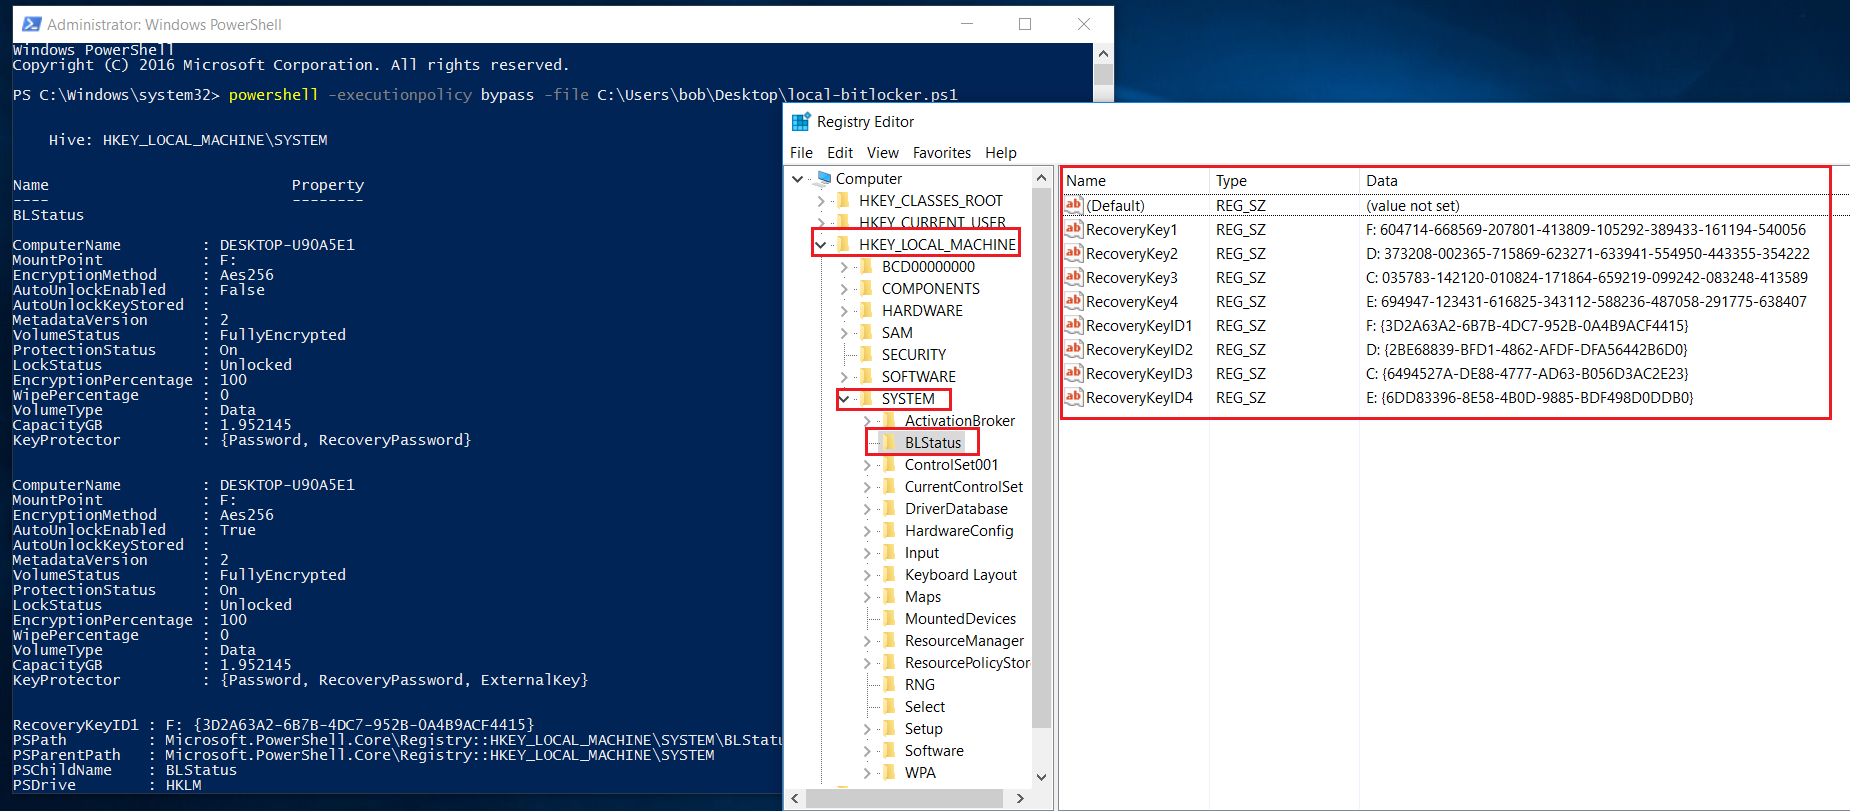
前面的这台设备是未加域的设备,经测试发现加域和未加域的设备自动解锁的方式有点不太一样,所以最后弄了两个脚本,一个是本地用户执行的脚本,另一个是域用户执行的脚本,根据客户端有无加域执行对应的脚本即可
Doamin User
#Get the drive letter | |
$DiskList = Get-Volume | where { ($_.DriveType -like 'Fixed') -and ($_.FileSystemLabel -notlike 'System Reserved')} | select -expand DriveLetter | |
# unlock disk | |
Foreach($disk in $DiskList) | |
{ | |
if ($disk -ne "C") | |
{ | |
Unlock-BitLocker -MountPoint $disk':' -Password $SecureString | |
Start-Sleep -seconds 2 | |
} | |
} | |
#Create registry key to store the Bitlocker information | |
New-Item -Path "HKLM:\SYSTEM" -Name "BLStatus" -ErrorAction Continue | |
#Enter the BitLocker Password | |
#$SecureString = ConvertTo-SecureString "password" -AsPlainText -Force | |
$SecureString = Read-Host "Please enter your BitLocker password: " -AsSecureString | |
#Check if Bitlocker is enabled | |
$Check = Get-Command 'manage-bde' -errorAction SilentlyContinue | |
if ($Check -eq $null){ | |
$hostname = hostname | |
[pscustomobject]@{ | |
Hostname=$hostname | |
DiskList= [string]$DiskList | |
EncryptionStatus="No BitLocker installed" | |
RecoveryKey="" | |
BackupStatus="N/A" | |
Date=date | |
} | Write-Host | |
break | |
} | |
[int]$c = 1; | |
Foreach($disk in $DiskList) | |
{ | |
$ID = & 'manage-bde' '-protectors' '-get' $disk':' '-type' 'RecoveryPassword' | |
[int]$i = 0; | |
foreach($s in $ID){ | |
$i+=1; | |
if ($s.Contains("{")){ | |
$start = $s.IndexOf("{") | |
$end = $s.IndexOf("}") | |
$Key = $s.Substring($start,$end-$start+1) | |
$Password = $ID[$i+1].Trim() | |
New-ItemProperty -Path "HKLM:\SYSTEM\BLStatus" -Name RecoveryKeyID$c -PropertyType String -Value $disk": "$Key -Force | |
New-ItemProperty -Path "HKLM:\SYSTEM\BLStatus" -Name RecoveryKey$c -PropertyType String -Value $disk": "$Password -Force | |
[int]$c = $c + 1; | |
# Backup Recovery Keys and return status in sdclient log | |
$Backup = & 'manage-bde' '-protectors' '-adbackup' $disk':' '-ID' $Key | |
foreach($s in $Backup){ | |
if ($s.Contains("success")){ | |
$Backup = "Successfull" | |
break | |
} | |
else{$Backup = "Failed"} | |
} | |
$hostname = hostname | |
[pscustomobject]@{ | |
Hostname=$hostname | |
DiskList=$disk | |
EncryptionStatus=$Status | |
RecoveryKey=$Password | |
BackupStatus=$Backup | |
Date=date | |
} | Write-Host | |
} | |
} | |
$date = date | |
} | |
Foreach($disk in $DiskList) | |
{ | |
if ($disk -ne "C"){ | |
# add domain users group | |
Add-BitLockerKeyProtector -MountPoint $disk':' -ADAccountOrGroup "demo\domain users" -ADAccountOrGroupProtector | |
Start-Sleep -Seconds 2 | |
} | |
} | |
# enable autounlock | |
Foreach($disk in $DiskList) | |
{ | |
if ($disk -ne "C"){ | |
Enable-BitLockerAutoUnlock -MountPoint $disk':' | |
Start-Sleep -Seconds 2 | |
} | |
} |
# EPM 自定义数据项目搜集
当 BitLocker 的密钥信息写入注册表后,此时在 EPM 控制台自定义搜集的注册表项目
依次点击 Reporting / Monitoring > Manage software list > Custom Data > Registry Items , 右键菜单选择 add ,填写对应的注册表 Key 和 Value ,以及该信息写入清单的路径
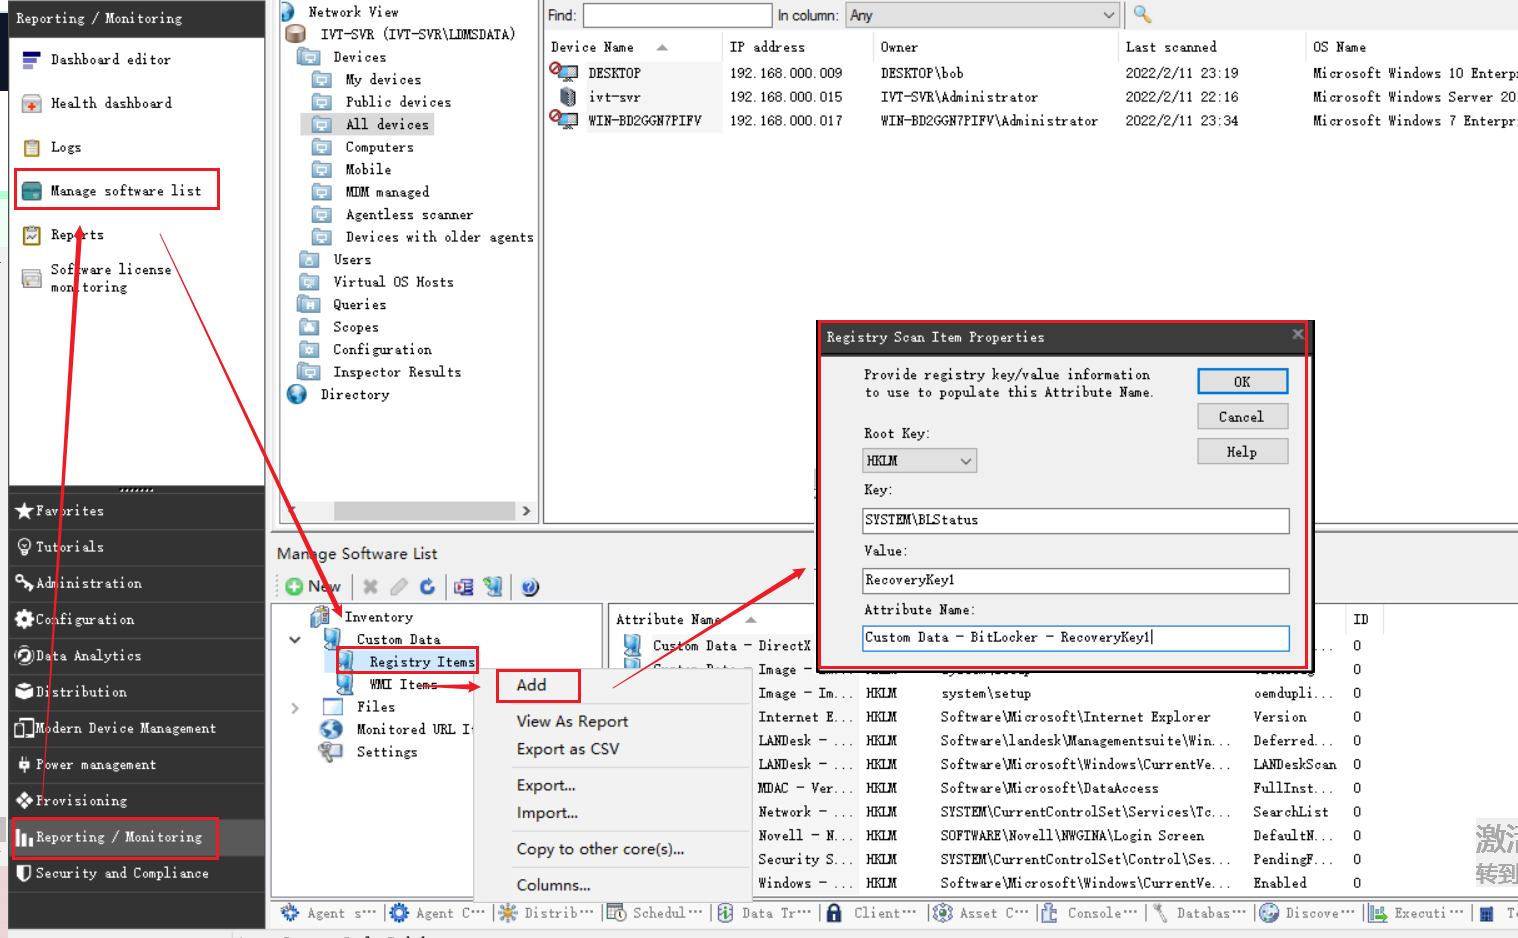
有多少个分区就添加多少条记录,一个分区需要两条记录,一条记录分区驱动器 ID,一条记录对应的恢复密钥
例如我这里的测试设备中,一台测试机最多只有 4 个分区,那我就只需要添加 8 条记录即可
添加完后,选中新增记录,点击 Make Available to Client 使设置生效
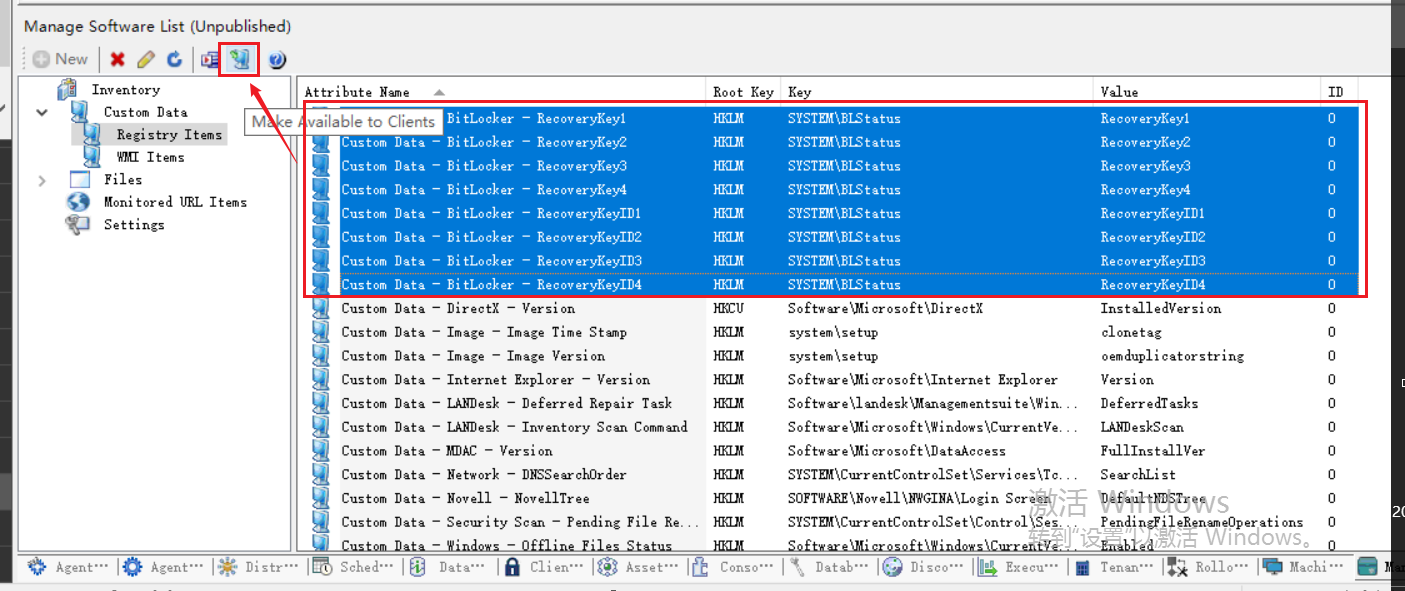
生效后,当客户端在下一次执行清单扫描的时候,EPM 就会将对应的注册表信息写入清单系统
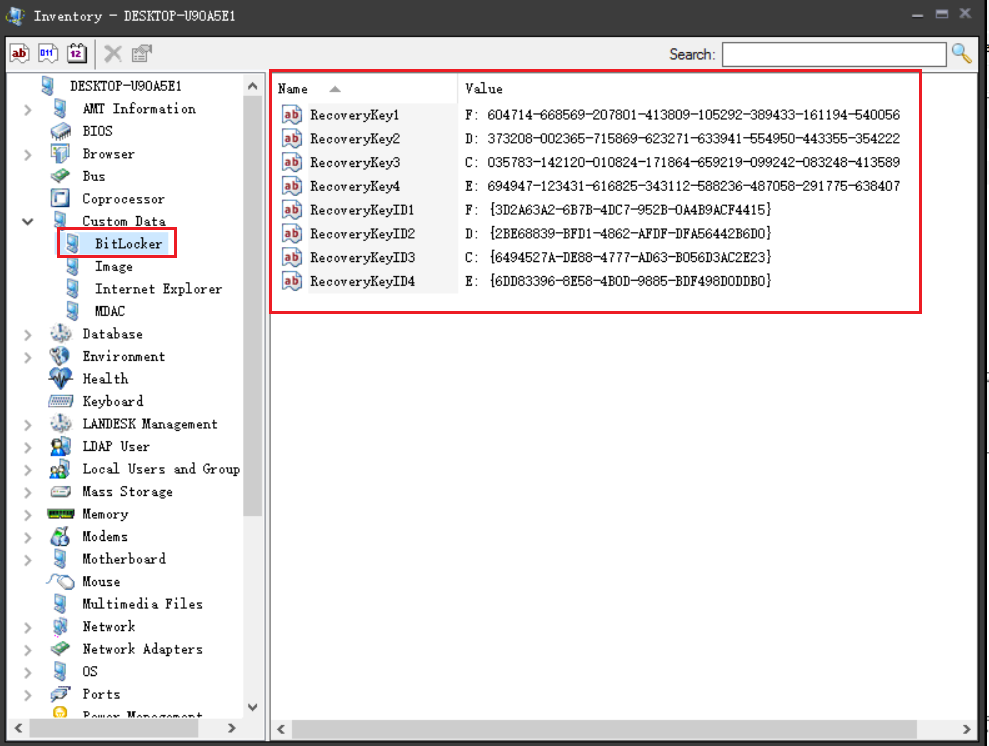
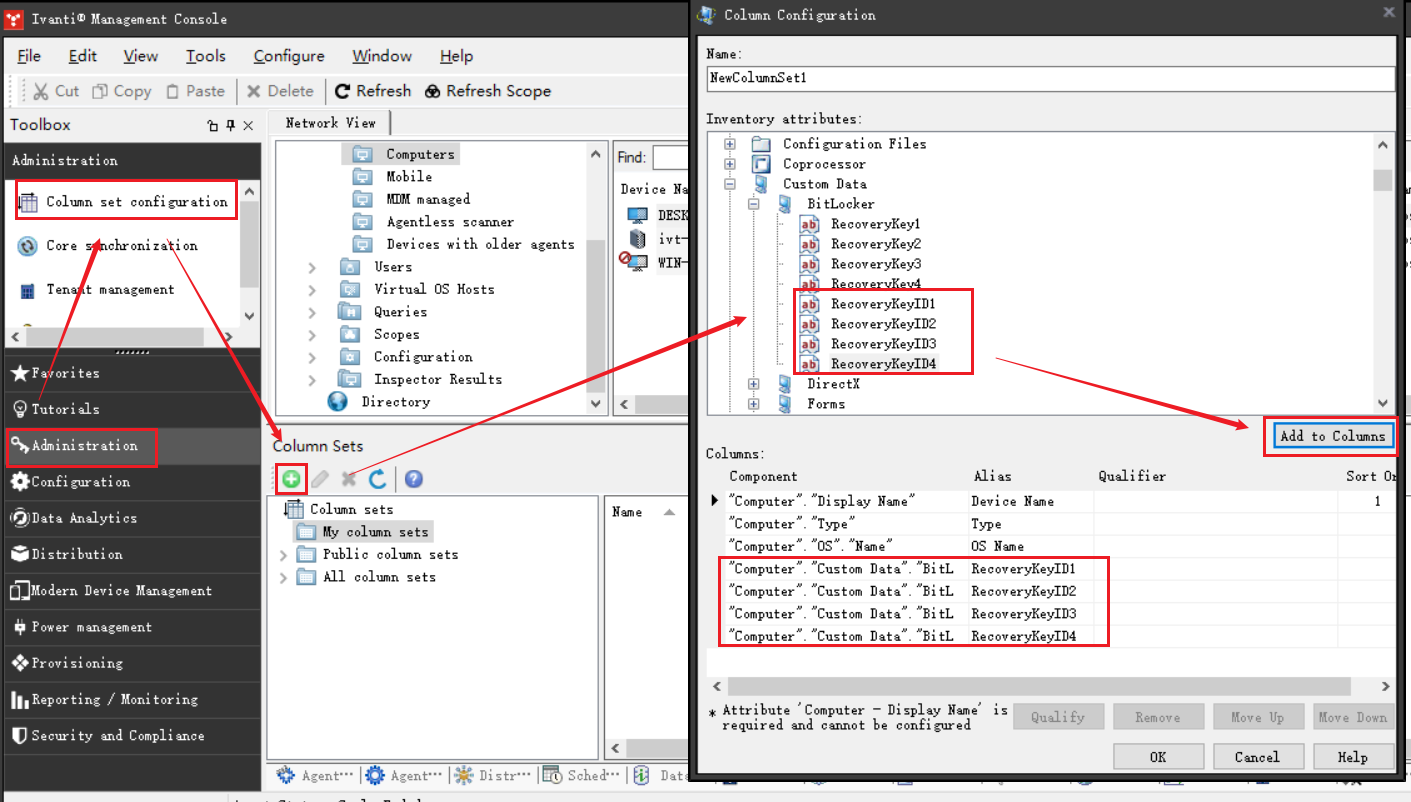
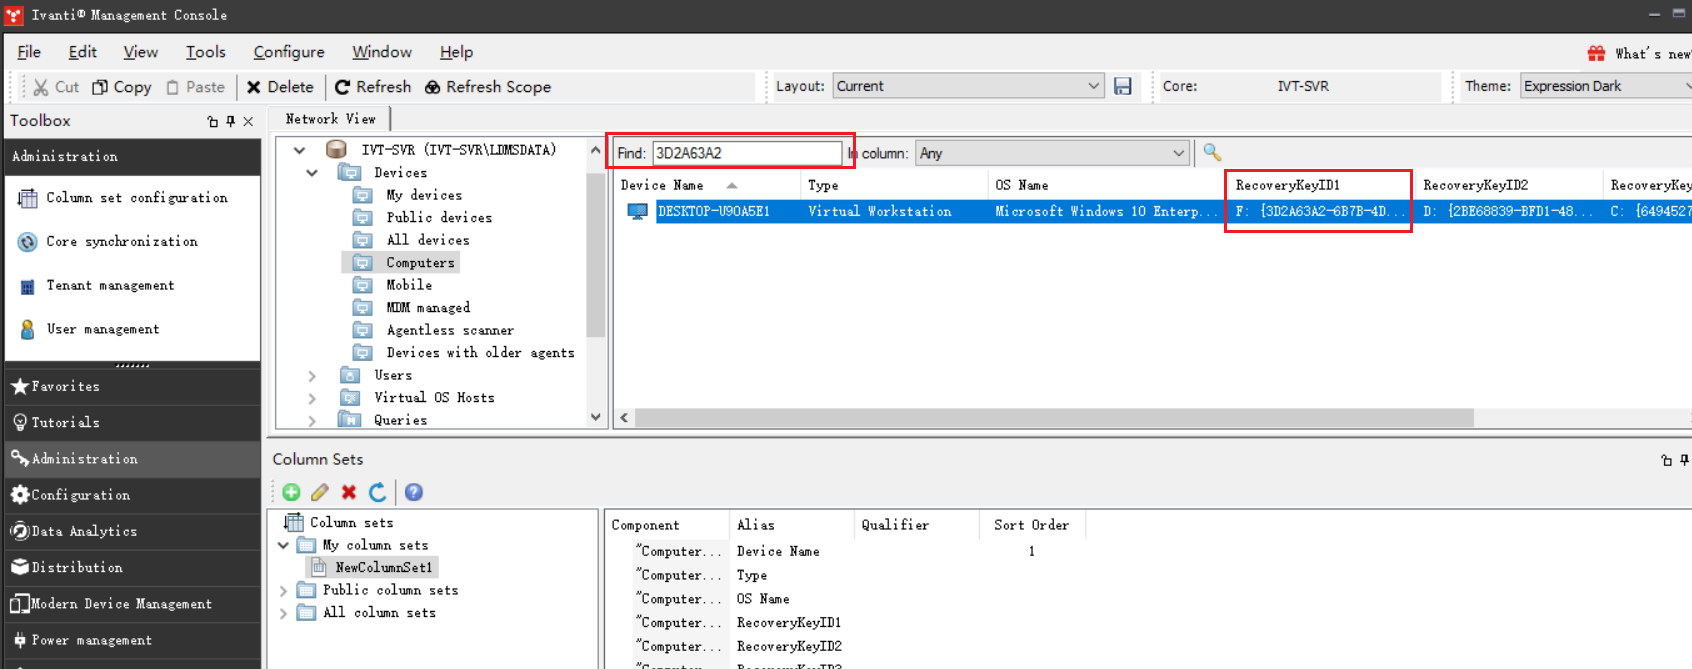
接下来仅需要在 EPM 控制台中将 BitLocker 的分区驱动器 ID 显示出来,方便快速查找对应的设备,提取恢复密钥信息
查找结果如下
好了,关于 EMP 管理 BitLocker 密钥的方法已经总结完了,后续如果有更加便捷的方法我再更新该文档